Installation
| Index |
|---|
| Installing DER-VET |
| Running a Case |
| Model Details |
| Services |
| Technologies |
| Command Line Inputs |
| Command Line Outputs |
| GUI Inputs |
| GUI Results |
| GUI Quick Start Cases |
| Resolving Issues |
The installation process for DER-VET is designed to be very straightforward for most users. If you downloaded DER-VET from www.der-vet.com and intend to use DER-VET's graphic user interface (GUI), then the default installation instructions below are most likely to be right for you. If you downloaded DER-VET from www.github.com, intent to modify the DER-VET source code, integrate it with other software directly, or wish to use a commercial optimizer (e.g. GUROBI), then the 'Installing from Source' section will be most applicable.
Installation Instructions
Note: Beginning with Version 1.2.3 (2023-02-06) the Windows installer is now code-signed (but not the Mac installer). In the first two releases of DER-VET (v1.0, v1.1), the application remained "unsigned". This will cause your computer to identify the application is of unknown origin when running the installer for the first time. On Windows, this can be circumvented by clicking "More Info" and then "Run Anyway". The process is similar on a Mac.
Windows Default Installation (most Windows users)
The version of DER-VET that is available on www.der-vet.com comes with an installer which does all of the heavy lifting.
- Download the DER-VET setup script for Windows from www.der-vet.com
- Save the setup script ('DER-VET Setup x.x.x.exe') to the location you want to install DER-VET
- Execute the setup script by double-clicking on its icon
The setup script should run and install DER-VET fully. It will make a shortcut in the directory where you ran the setup script. This shortcut will execute the DER-VET program and open a fully-functional GUI. A previously existing version of DER-VET will get replaced.
Note: this video does not have any sound.
Mac Default Installation (most Mac users)
The version of DER-VET that is available on www.der-vet.com comes with an installer which does all of the heavy lifting.
- Download the DER-VET setup script for Mac from www.der-vet.com
- Save the setup script ('DER-VET Setup x.x.x.dmg.zip') to the location you want to install DER-VET
- Execute the setup script by double-clicking on its icon
- In the pop-up window, click and drag the DER-VET icon to drop it into the Applications folder, as indicated.
The setup script should run and install DER-VET fully. It will make a shortcut in the Applications folder. This shortcut will execute the DER-VET program and open a fully-functional GUI. You will be given the option to replace or keep an existing version of DER-VET.
Note: this video does not have any sound.
Installing from Source
DER-VET may be run from the command line by first accessing the code repository from EPRI’s Github page:
Download the latest version of DER-VET to your local machine by opening a terminal and typing:
git clone https://github.com/epri-dev/DER-VET.git
The git clone command creates a new local folder named DER-VET, which will contain a cloned repository with all of the code.
There is a README.md on the GitHub page with detailed instructions on how to get DER-VET running from the command line for both Windows and Mac machines. The proper Python environment must be in place locally.
Licensing DER-VET
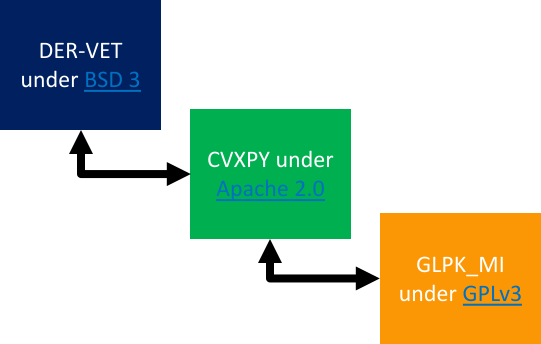
DER-VET is an open-source tool and most end users should have no trouble using DER-VET for any purpose. But, user-developers who wish to modify and release their own version, integrate DER-VET into other software and license it themselves, or other activities that involve licensing DER-VET code should understand the licensing structure below. Components of DER-VET are licensed with different open-source licenses to accommodate their particular needs.
The analytical core code of DER-VET is licensed under the BSD 3-clause license, which is a highly permissive open source license. This applies to all code written by EPRI in Python that performs the technical analysis, set up the core optimization problem, and executes any post-optimization calculations.
DER-VET interfaces with a Python library, cvxpy, to formulate the optimization problem determined by the DER-VET analytical core code. This is licensed under the Apache 2.0 license. Any derivative software must respect this license if cvxpy is used.
DER-VET uses, by default, the GNU Linear Programing Kit Mixed Integer (GLPK_MI) optimization solver to solve optimization problems determined by DER-VET and formulated in cvxpy. This solver is included alongside DER-VET and is licensed under the GNU Public License v3 (GPLv3). Other solvers may be used, including commercial solvers, which are licensed separately. The license of any solver used by derivative software must be respected.
Using other solvers
The process for changing the solver used in DER-VET is very straightforward if running the source code on the command-line. First, another solver that is compatible with CVXPY and the kind of optimization problem being solved must be installed according to its instructions. Navigate to the file .\dervet\storagevet\storagevet\Scenario.py and locate the lines which specify the solver that will get used. DER-VET currently includes the use of 2 solvers: cvx.GLPK_MI and cvx.ECOS_BB. Optimizations are run from the ordered list seen in this file. cvx.GLPK_MI is used first, and if any error is encountered, cvx.ECOS_BB will be used. Search the file .\dervet\storagevet\storagevet\Scenario.py for GLPK_MI and find the 2 lines where it is used to make appropriate edits and bring in another solver.
